Campervan Tech & Electrics
Campervan electric systems: how to judge a good one

Written by
Leo
Leo covers campervan technology, maintenance, kit, and ownership advice, with a clear, practical focus on how things work in real life.
The short answer
A good campervan electric system is sized to how you actually camp, not to the biggest numbers on a sticker. The core is a healthy leisure battery (lithium for heavy off-grid use, AGM for budget or light use), a DC-DC charger to charge it while driving, solar for top-ups, and a clear battery monitor so you always know what is left. Match capacity to your daily draw, check the charging paths, and prioritise good wiring and fusing over a huge inverter you rarely use.
Most campervan adverts shout about the kitchen and the bed. The electrics get a line or two and a couple of confident-sounding numbers. Yet the electrical system is what decides whether your weekend away is relaxed or whether you spend Sunday morning nursing a flat battery and a cold kettle. The good news is you do not need to be an electrician to judge one well. You just need to know what the parts do, how they work together, and which numbers actually matter.
This is a practical guide to reading a campervan's electrical setup like someone who has done it before, whether you are buying a finished van, speccing a conversion, or trying to understand the system you already own.
Start with how you actually camp
Before you look at a single component, picture your real trips. A system that is perfect for one person is wasteful for another. The honest question is not "what is the best setup", it is "what do I draw, and where will it come from".
Three broad patterns cover most people:
- Campsite-led touring. You mostly stay on sites with a hook-up (EHU). You need enough battery to manage the odd night off-grid and a good mains charger. You do not need a huge solar array or a giant battery bank.
- Mixed touring. Some sites, some wild-ish park-ups, the occasional couple of days without mains. This is the sweet spot for a balanced system, and where most factory campervans aim.
- Off-grid living. You want to park for days with no hook-up, run a compressor fridge constantly, charge laptops, maybe run a diesel or electric heater fan. This needs serious battery, strong charging, and careful monitoring.
Everything below should be read against your honest pattern. A spec that looks thin for off-grid living can be ideal for campsite touring, and there is no point paying for capacity you will never use.
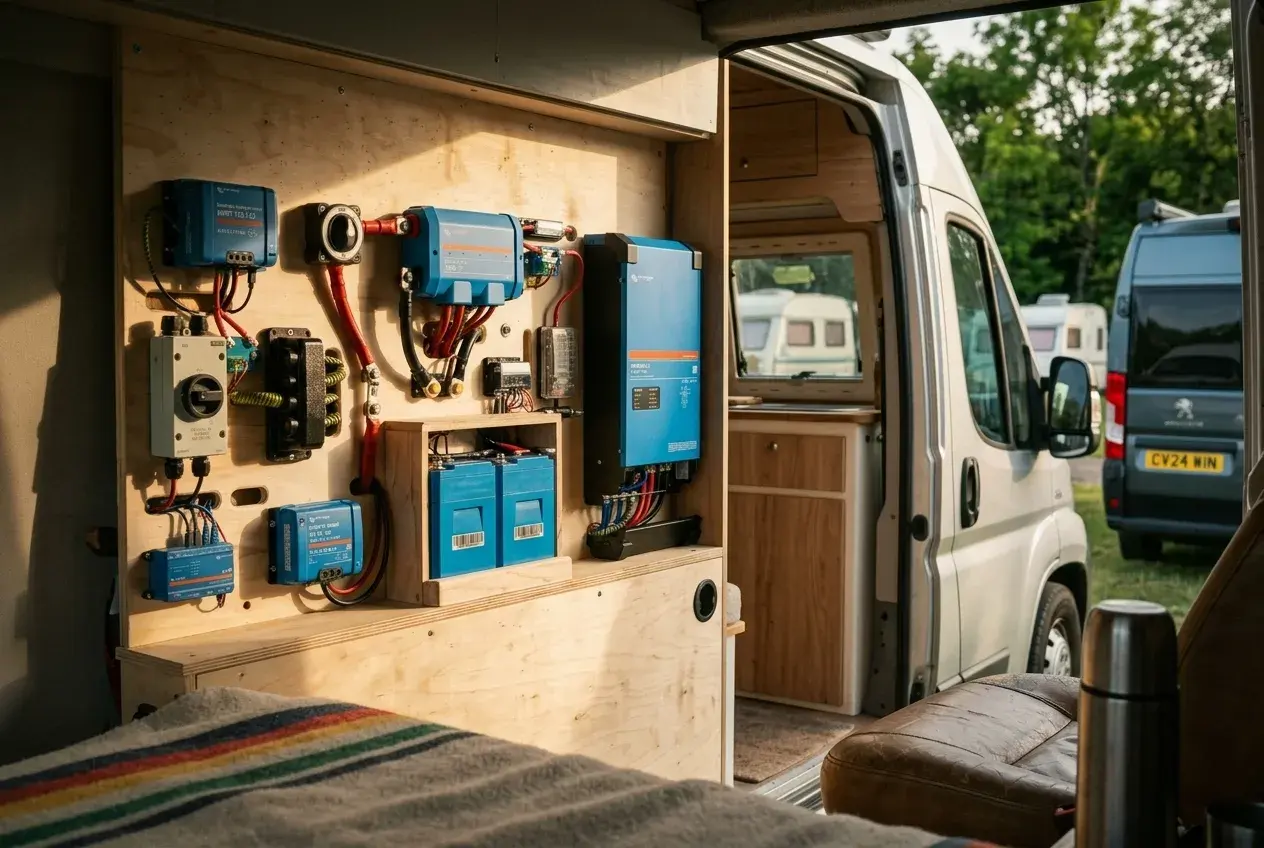
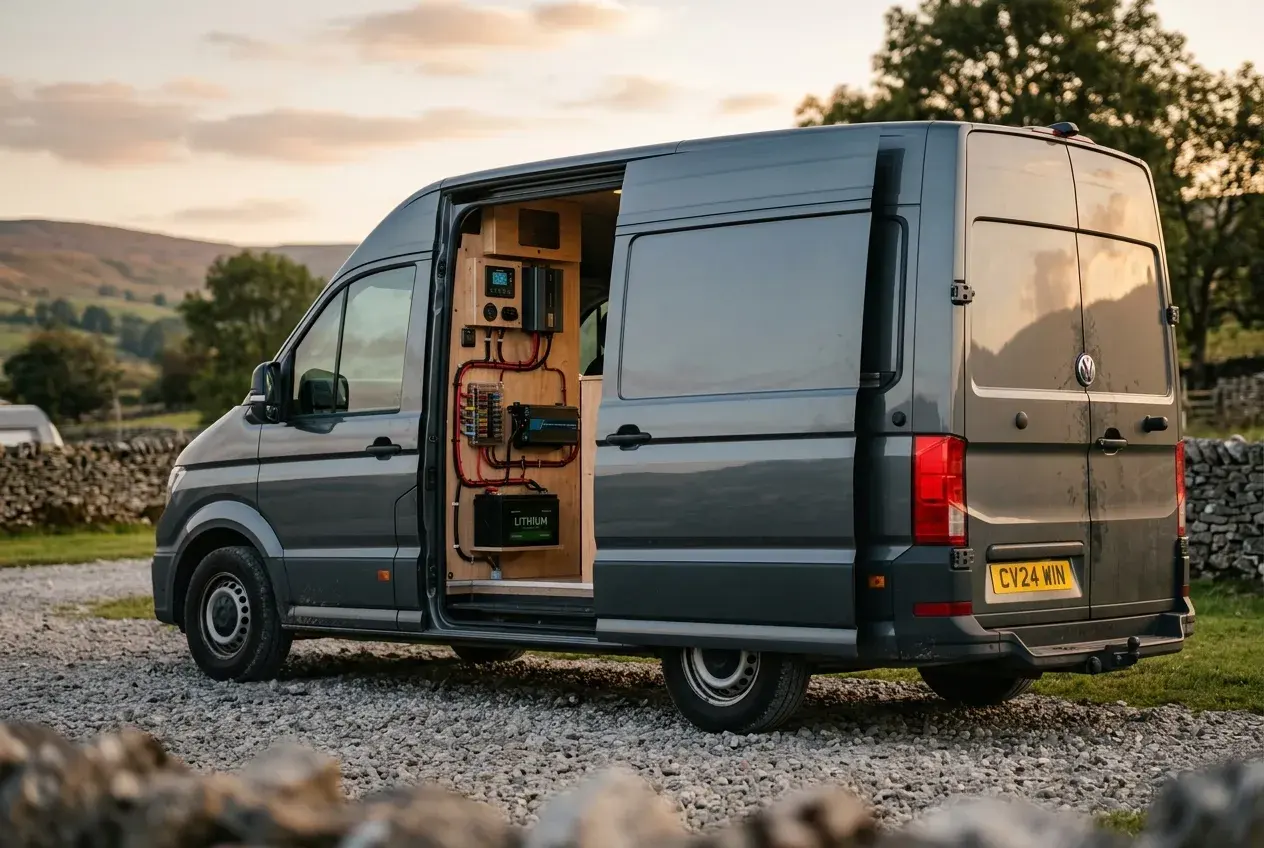
The leisure battery: the heart of the system
The leisure battery stores the energy you use when the engine is off. It is the single most important part, and the part most worth understanding.
Lead-acid and AGM
Traditional leisure batteries are lead-acid, usually in a sealed AGM form. They are cheaper to buy and widely fitted. The catch is usable capacity. As a rule of thumb you should only draw a lead-acid battery down to around 50 percent before it starts to suffer, so a 100Ah AGM gives you roughly 50Ah of genuinely usable energy. They also charge more slowly as they near full, and they dislike being left part-discharged for long.
Lithium (LiFePO4)
Lithium iron phosphate batteries cost more up front but change the maths. You can safely use around 80 to 90 percent of their capacity, they charge much faster, they are lighter, and they last for thousands of cycles if treated well. A 100Ah lithium gives you something close to 90Ah usable, so it often does the work of two lead-acid batteries. For off-grid use the extra cost usually pays for itself in capability and lifespan.
One honest caveat: standard lithium batteries do not like charging below freezing. Many now include internal low-temperature protection or self-heating, which matters a lot if you tour in winter. Check for it rather than assuming it.
When you see a capacity quoted, mentally convert it to usable energy. A "200Ah" lead-acid bank and a "100Ah" lithium bank can deliver very similar real-world energy, and the lithium will charge faster and weigh less.
Charging: the part that gets ignored
A big battery with weak charging is a poor system. There are three ways to put energy back in, and a good van uses at least two of them well.
1. Mains hook-up (EHU)
When you plug into a campsite post, a mains charger tops up the battery. Look at the charger's output in amps. A 10 to 25 amp charger is typical. For lithium this matters more, because lithium can accept a fast charge and a weak charger wastes that ability. Also check the charger is set for the right battery type. A mains charger configured for lead-acid will never properly fill a lithium battery.
2. Charging while driving
This is where older vans and newer vans differ most. A basic setup uses a voltage-sensitive relay (a split charge relay) that simply connects the starter and leisure batteries when the engine runs. It works, but it charges slowly and badly, especially for lithium, and many modern vehicles with "smart" alternators confuse it.
The modern answer is a DC-DC charger (sometimes called a B2B). It takes power from the engine and delivers a proper, controlled charge to the leisure battery, typically rated at 20, 30 or 50 amps. If a van tours off-grid and relies on driving days to recharge, a DC-DC charger is close to essential. Seeing one fitted is a strong sign the system was thought through.
3. Solar
Solar panels quietly top the battery up whenever there is daylight. Two things matter: the panel wattage and the controller. A good system uses an MPPT controller, which is noticeably more efficient than the cheaper PWM type, especially in dull British weather. As a rough guide, 100 to 200W of solar suits mixed touring, while serious off-grid setups run 300W or more. Solar rarely fully powers a van alone in a UK winter, but across spring to autumn it can keep a sensibly sized battery healthy with no effort from you.
The inverter: useful, but often oversold
An inverter turns 12V battery power into 230V mains so you can run household plugs. They are genuinely handy for charging laptops, running a small kettle, or the occasional hairdryer. But they are also where spec sheets get carried away.
A 2000W inverter sounds impressive, but running it hard drains a battery fast. Boiling a 2kW kettle for a few minutes can pull a large chunk out of even a good lithium bank. So judge an inverter by two things:
- Is it sized to a real need? A 300 to 700W pure sine wave inverter covers most genuine van uses. A huge inverter is only worth it if the battery and wiring behind it can actually feed it.
- Is it pure sine wave? Cheaper modified sine wave units can upset sensitive electronics and some chargers. Pure sine wave is the safer choice.
A clever modern alternative is to skip mains for small jobs entirely. USB-C charging straight from 12V, and 12V appliances, are far more efficient than running an inverter to power a mains charger that then steps voltage back down.
Monitoring: the difference between confidence and guesswork
This is the part people underrate until they have lived without it. A simple voltage readout tells you very little, because battery voltage sags under load and recovers at rest. What you want is a proper battery monitor (often a shunt-based one) that shows the real state of charge as a percentage and the current flowing in and out.
With a good monitor you know at a glance whether you can run the heater tonight or whether you need a driving day tomorrow. Without one, you are guessing, and guessing is how batteries get flattened. Many quality systems now show all of this on a phone app, which is convenient, but make sure there is a way to read it without the phone too.
The boring bits that actually keep you safe
The components get the attention, but the install quality is what keeps the van reliable and safe. These are the things a careful eye checks, and they separate a properly built system from a tidy-looking one.
- Wire sizing. High-current runs, especially to an inverter, need thick cable. Undersized wire gets hot and wastes energy. This is a common corner-cut.
- Fusing. Every circuit and every battery connection should be fused close to the source. A fuse near the battery is not optional, it is what stops a fault becoming a fire.
- Connections. Crimped, tight, and protected. Loose or corroded connections cause voltage drop, odd faults, and heat.
- Battery location and ventilation. Batteries should be secured so they cannot move, and lead-acid types need ventilation. Lithium is more flexible but still needs to be mounted properly.
- Gas and electric separation, and RCD protection on the mains side. A proper consumer unit with an RCD protects you on hook-up.
If you are buying a used conversion, ask to see the fusing and the cable runs. A builder who is proud of the work will happily show you. Reluctance is a fair warning sign.
How factory and converter systems compare
Big-name factory campervans tend to fit conservative, reliable systems: a single AGM or modest lithium battery, a decent built-in charger, modest solar, and a sensible inverter or none at all. They are warrantied, neat, and balanced for typical use. The trade-off is that capacity can feel tight if you want to live off-grid, and upgrading later can be fiddly because everything is integrated.
Specialist converters and self-builds vary enormously. The best are superb, with generous lithium, strong DC-DC and solar charging, and clear monitoring. The weakest pair an eye-catching battery figure with thin wiring and poor charging. This is exactly why you learn to read the whole system rather than the headline number. A modest, well-built system beats a big, badly-built one every time.
A simple way to score any system
When you stand in front of a van, run through this quick mental checklist. It will tell you more than any brochure.
- Battery: what type and capacity, and how much of that is usable?
- Charging while driving: a proper DC-DC charger, or just a basic relay?
- Mains charger: what output, and is it set for the right battery type?
- Solar: how much, and is it an MPPT controller?
- Inverter: sensibly sized and pure sine wave, or oversized for show?
- Monitoring: can you see real state of charge, not just voltage?
- Install quality: proper wire sizing, fusing at the battery, tidy secured connections?
If a van scores well on charging, monitoring and install quality, it is usually a good system even with a modest battery. If it leans entirely on one big number and falls down on the rest, be cautious.
Matching capacity to your real draw
To turn this from theory into numbers, add up what you genuinely use in a day. A compressor fridge might use 30 to 50Ah over 24 hours. Lights, water pump, phone charging and a heater fan together might add another 10 to 30Ah depending on the weather and how long you run things. Laptops and an inverter for occasional cooking can add a lot more.
For a rough target: light campsite use is comfortable on around 100Ah of usable capacity. Mixed touring is happier with 150 to 200Ah usable. Genuine off-grid living, especially in shoulder seasons, often wants 200Ah or more of lithium plus strong solar and a DC-DC charger to refill it. These are guides, not rules, and your own draw is the figure that matters most.
Upgrading what you have
If you already own a van and the system feels tight, you rarely need to rip it out. The most effective upgrades, roughly in order of value, tend to be:
- Fit a proper battery monitor first, so you actually understand your usage.
- Add or increase solar with an MPPT controller, the easiest free energy you will get.
- Add a DC-DC charger if you rely on driving days and only have a basic relay.
- Move to lithium if you keep hitting the usable-capacity ceiling, but size the charging to suit it.
Doing it in that order means you spend money where it helps, and you avoid buying a big battery you cannot keep charged.
The bottom line
A campervan electric system is not about the biggest battery or the most powerful inverter. It is about balance: a healthy battery you can actually use most of, charging paths that genuinely refill it, monitoring that keeps you honest, and an install that is safe and tidy. Judge the whole picture against how you really travel, and you will spot a good system, and an overrated one, in a couple of minutes. Get that balance right and the electrics simply disappear into the background, which is exactly what good electrics are supposed to do.
Common questions
Is lithium worth the extra cost over AGM in a campervan?
For frequent off-grid use, usually yes. Lithium lets you use around 80 to 90 percent of its capacity versus roughly 50 percent for lead-acid, charges much faster, weighs less, and lasts far longer. For light campsite-led touring, a good AGM setup can be perfectly adequate and cheaper up front.
What size leisure battery do I need?
It depends on your daily draw, not a fixed rule. As a rough guide, light campsite use is comfortable on around 100Ah of usable capacity, mixed touring on 150 to 200Ah, and genuine off-grid living often wants 200Ah or more of lithium with strong charging to refill it.
Do I really need a DC-DC charger?
If you tour off-grid and rely on driving days to recharge, it is close to essential, especially with lithium or a vehicle with a smart alternator. It delivers a proper controlled charge that a basic split-charge relay cannot. For campsite-led touring with mains hook-up, it matters less.
How big an inverter should a campervan have?
Usually smaller than people expect. A 300 to 700W pure sine wave inverter covers most genuine van jobs like charging laptops. Large inverters drain batteries fast and are only worth it if the battery and wiring can feed them. For small jobs, charging straight from 12V is far more efficient.
Why does a battery monitor matter so much?
Voltage alone is misleading because it sags under load and recovers at rest. A proper shunt-based monitor shows real state of charge as a percentage and the current flowing in and out, so you know whether you can run the heater tonight or need a driving day, instead of guessing and flattening the battery.
Enjoyed this post?
Get more honest campervan guides like this one in your inbox.
You’re in!
Check your inbox. We’ve just sent you a welcome email.

About the author
Leo
Leo covers campervan technology, maintenance, kit, and ownership advice, with a clear, practical focus on how things work in real life.
Keep Reading
Related Reading
Thoughtful articles that build on what you’ve just read.
Campervan Tech & Electrics
10 min read
The best campervan electrical systems, explained honestly
A plain-English guide to what makes a campervan electrical system genuinely good, from leisure batteries and charging to inverters and safety, with honest setups for different ways of travelling.

Campervan Tech & Electrics
11 min read
Campervan air conditioning: the honest UK guide for motorhomes and vans
A practical look at whether air conditioning is worth fitting to your van, the real pros and cons, the main types, what it takes to run off-grid, and which system suits which budget.

Campervan Tech & Electrics
26 min read
Off-grid for real: what 100Ah lithium and Alde heating get you in a 4x4 van
An honest, detailed look at what a single 100Ah lithium battery and an Alde wet heating system actually deliver in a 4x4 campervan, with real UK figures, day counts, and the mistakes that catch people out.
Campervan Tech & Electrics
7 min read
Are electric campervans ready yet? The honest 2026 picture
A clear, no-spin look at where electric campervans actually stand in 2026: real range, charging, weight, cost, and who they suit right now.