Campervan Kit & Gear
Campervan leveling options: what's best, what's best value, and what should you choose?

Written by
Leo
Leo covers campervan technology, maintenance, kit, and ownership advice, with a clear, practical focus on how things work in real life.

A level van changes everything. Sleep, cooking, even how your fridge works all depend on the van sitting flat. Park on a slope and the whole night feels wrong. You roll into the wall, the cupboard door swings open, the kettle sits at an angle, and the absorption fridge slowly stops doing its job. The good news is that fixing this is one of the cheapest and most satisfying upgrades you can make. The confusing part is the sheer number of options, from a pair of plastic wedges that cost less than a tank of fuel to automatic hydraulic systems that cost more than a decent second-hand car.
This guide walks through every realistic way to level a campervan or motorhome in the UK. It covers what each option actually does, what it costs, where it shines, and where it lets you down. By the end you should know exactly which approach fits your van, your budget, and the kind of trips you take. There is no single right answer here. The best choice for a couple touring France in a coachbuilt is not the best choice for someone weekending in a small camper on UK club sites. So let's work through it properly.
Why leveling matters more than people think
It is tempting to treat leveling as a comfort thing, a nice-to-have for fussy sleepers. It is more than that. Several systems in a campervan are genuinely affected by how flat the van sits.
Your fridge depends on it
Most leisure vehicles use a three-way absorption fridge that can run on gas, mains, or 12V. These fridges have no compressor. They work by circulating a chemical solution that relies on gravity to flow correctly. When the van is tilted, the flow is disrupted, cooling drops off, and over time the fridge can be damaged. Manufacturers typically quote a tolerance of around 3 degrees off level for these fridges, which is not very much at all. A pitch that looks nearly flat to your eye can still be enough to cook your dinner instead of chilling it. Compressor fridges, the kind found in many newer conversions, are far more forgiving and will work happily on a noticeable slope, so if you have one, fridge performance is not a reason to obsess over leveling.
Sleep quality is real
Sleeping with your head lower than your feet, or rolling sideways into your partner all night, is genuinely unpleasant. A slope of just a couple of degrees is enough to feel wrong once you lie down. Side-to-side slope is worse than front-to-back for most people. Getting the van level is the single biggest thing you can do for a good night in a van.
Water drains and doors behave
A level van means your shower tray and sink drain properly rather than leaving a pool in one corner. Cupboard and wardrobe doors stay shut instead of swinging open. The toilet cassette sits as designed. Even the gas hob behaves better with pans sitting flat. None of these are dramatic on their own, but together they make the difference between a van that feels finished and one that feels like camping in a tilted shed.
It protects the van too
Parking heavily tilted for long periods puts uneven load through the suspension, and on motorhomes with a fixed bed over the cab or a heavy rear garage, a bad slope concentrates weight awkwardly. It is not catastrophic, but a level van is a happier van.
How level is level enough?
You do not need laboratory precision. For comfortable sleeping and a happy absorption fridge, aim to get within about 1 to 2 degrees in both directions. That is usually achievable on all but the worst pitches. A small spirit level, or better still a pair of cheap stick-on bubble levels, will tell you everything you need to know. Stick one on the dashboard reading side-to-side and one reading front-to-back, and you can level the van from the driver's seat in many cases.
Prioritise side-to-side level first. Rolling sideways in bed is the most uncomfortable thing, and the absorption fridge is usually most sensitive across its width too. Front-to-back you can often live with a very slight nose-down or nose-up attitude, and a small adjustment with the steering or a single ramp usually sorts it.
A useful rule of thumb: if a marble placed on the floor rolls slowly, you can probably live with it for a night. If it rolls briskly, get the levelers out.
The full range of options, from cheapest to dearest
Here is the landscape before we go deep on each. Roughly in order of cost:
- Spirit levels and bubble indicators, a few pounds, the starting point for everything.
- Plastic leveling ramps (chocks), around £20 to £45 a pair.
- Stackable leveling blocks, around £25 to £50 a set.
- Curved or stepped ramps with chocks, around £30 to £60.
- Heavy-duty or wide ramps for larger motorhomes, around £50 to £120.
- Manual wind-down corner steadies and jacks, varies hugely, often factory-fitted.
- Air suspension assistance, around £900 to £2,500 fitted, not strictly leveling but related.
- Semi-automatic and fully automatic hydraulic or electric leveling systems, around £3,000 to £8,000 fitted.
Let's take each properly.
The free and nearly free first step: spirit levels
Before you spend anything on ramps, spend a few pounds on the means to actually see how level you are. You cannot level a van you cannot measure. Eyes lie, especially when the ground around the van slopes too.
Stick-on bubble levels
The classic solution is two small circular or tube bubble levels stuck to the dashboard or door frame. One reads side-to-side, one reads front-to-back. They cost a couple of pounds for a pack. Fit them while the van is genuinely level (a flat garage floor or a known-level driveway), so they read true. From then on you can pull onto a pitch, glance at the dash, and know which way to move.
Phone apps
Every smartphone has a level sensor, and there are free spirit-level apps that work fine. They are handy as a backup, but a stuck-on bubble level you can see from the driver's seat is faster and never runs out of battery. Some people prefer a small magnetic spirit level kept in the door pocket, placed on the floor or a worktop to check.
The reference surface matters
Check level against a surface that matters to you. The floor is the honest one for sleeping and for the fridge. Worktops and dashboards can be slightly out of true from how the van was built, so calibrate your indicators against the floor or against a known-flat surface, then trust them.
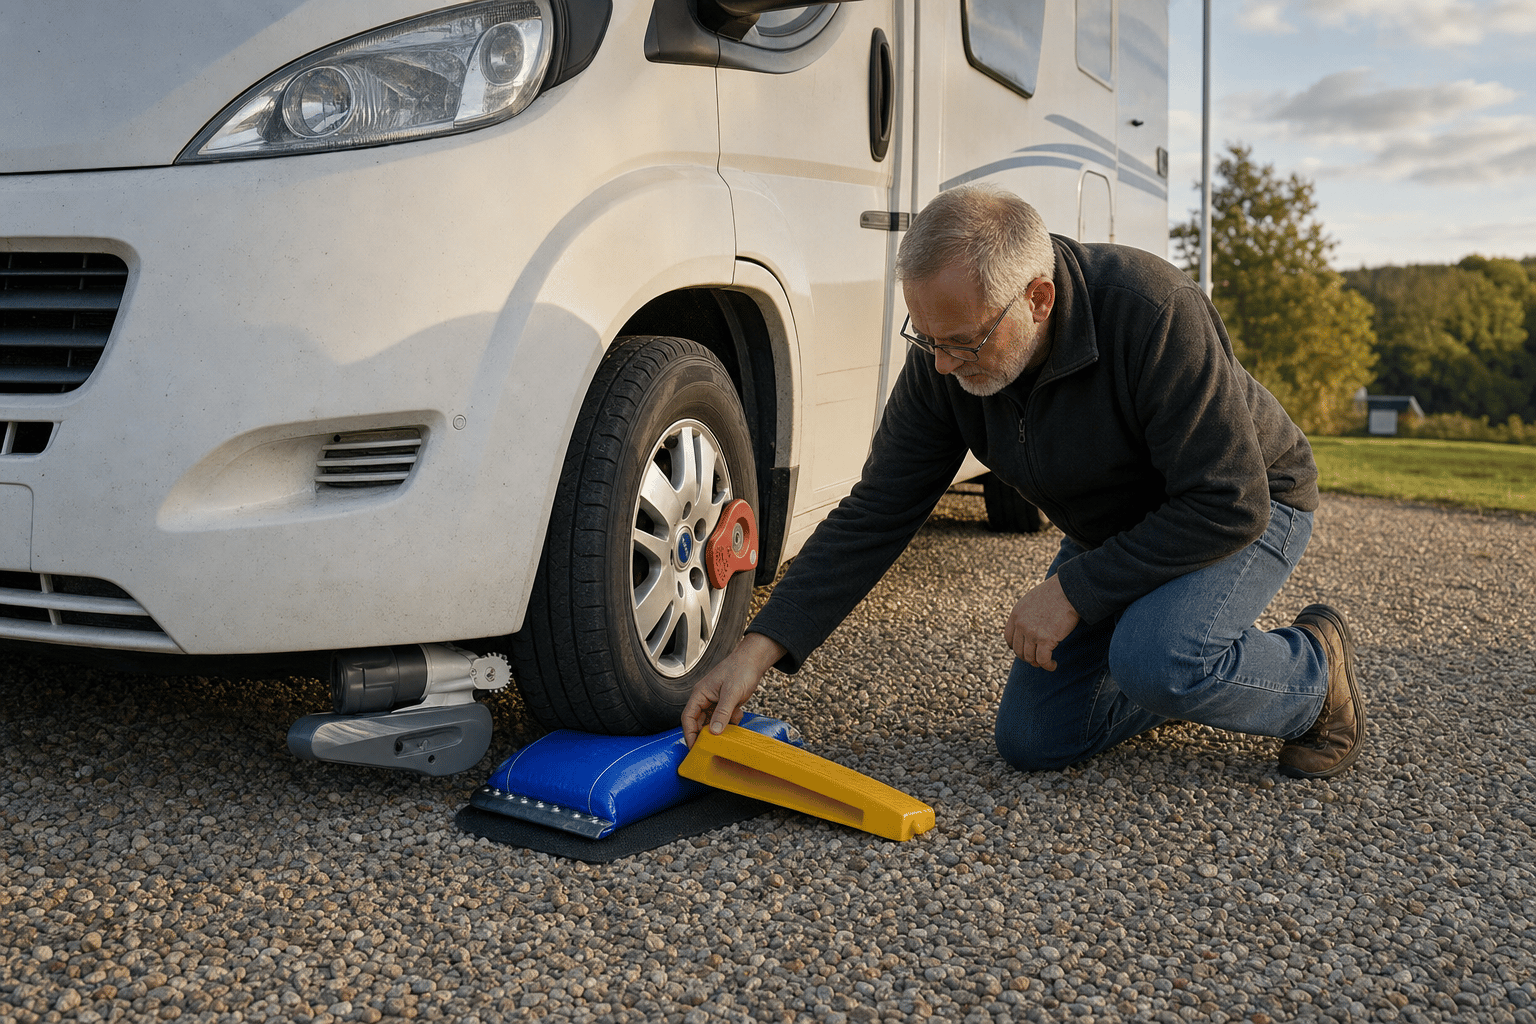
Leveling ramps and chocks: the workhorse option
For the overwhelming majority of UK campervan and motorhome owners, plastic leveling ramps are the answer. They are cheap, light, simple, and they work. If you only ever buy one leveling product, buy a good pair of these.
How they work
A leveling ramp is a wedge or stepped block of tough plastic. You place it in front of (or behind) the wheels on the low side of the van, then drive gently up onto it until the bubble level reads true. Drive forward or reverse, whichever raises the low corner. To hold the van in place you then chock the wheel so it cannot roll back off, apply the handbrake firmly, and for a manual leave it in gear.
Single-wheel versus axle-wide
On a typical campervan or panel-van conversion you usually only need to lift one side, so a single ramp under one front wheel, or one under each wheel on the low side, does the job. On a twin-axle motorhome you may want a longer ramp that the rear wheels can both sit on, or two ramps placed carefully, because lifting only one of a pair of close-coupled rear wheels can twist things. Read your handbook for twin-axle vans, as some makers advise against lifting just one wheel of a tandem axle.
Curved ramps vs stepped ramps
There are two broad styles. Curved ramps give a smooth, continuous slope so you can stop at any height, which makes fine adjustment easy. Stepped ramps give you fixed heights, like a staircase, which some people find easier to judge and which can grip better. Both work. Curved tend to be marginally more versatile, stepped tend to be marginally more secure against rolling. Honestly, either is fine. Many designs combine the two.
What good ones cost
A decent pair of plastic leveling ramps in the UK runs from about £20 to £45. Cheaper sets exist, but very cheap plastic can crack under a heavy motorhome on a cold day, so for anything over about 3.5 tonnes it is worth buying ramps rated for the weight. Heavy-duty ramps designed for larger coachbuilts and A-class motorhomes run £50 to £120 a set and are wider, taller, and made of tougher material. Spending the extra here is sensible if your van is heavy, because a ramp that splits under load is both annoying and slightly alarming.
The accessories that make ramps work better
- Wheel chocks. Once up the ramp, the wheel wants to roll back down. A simple plastic or rubber chock behind the wheel stops that. Some ramp sets include matching chocks that clip on.
- A grippy mat or rubber feet. On wet grass or smooth tarmac, ramps can slide forward as you drive up them instead of letting the wheel climb. A rubber-backed ramp, or a square of grip mat under the ramp, solves this. This is the single most common frustration people have with ramps, and it is entirely fixable.
- A storage bag. Ramps get muddy. A bag keeps the boot or garage clean.
The honest pros and cons
Pros: cheap, light, take up little space, nothing to break, work on virtually any surface, no installation. Cons: you have to get out and place them, you may need to do a little drive-up-check-reverse dance to nail the height, and on a really severe slope a single ramp may not lift enough. You also cannot easily level front-to-back and side-to-side at the same time with ramps alone on a badly sloping pitch, though clever placement gets you a long way.
The technique that makes them effortless
With a bit of practice, ramps take under two minutes. Pull onto the pitch roughly where you want to end up. Glance at the bubble levels. Decide which corner is lowest. Place the ramp tight against the tyre on the low side. Have your partner watch the bubble (or use a level you can see) and creep the van up the ramp until level. Stop, handbrake, chock, done. The first few times feel fiddly. After a season it is second nature.
Stackable leveling blocks: the flexible cousin
Leveling blocks are interlocking plastic blocks, a bit like large building bricks, that you stack to whatever height you need and then drive onto. They are popular in the US and increasingly common in the UK.
Why some people prefer them
The appeal is precision and flexibility. You can build a low single-block step or a tall multi-block tower. You can use them under jacks, under steadies, even under a single wheel that has dropped into a dip. A set typically costs £25 to £50 and packs flat. They are excellent for awkward pitches where a fixed ramp does not give you the right height.
The downsides
You usually need to build a small pyramid or staircase out of them so the wheel can climb up, which uses several blocks and a bit of fiddling. On soft ground they can sink unless you put a base block under them. They are slightly more faff than just plonking down a ramp, but they reward you with more control. For many owners, a pair of ramps plus a handful of leveling blocks is the ideal kit, ramps for the everyday and blocks for the unusual.
Wind-down corner steadies: not for leveling, but worth understanding
Most coachbuilt motorhomes and caravans have corner steadies, the legs you wind down at each corner. New owners often assume these are for leveling. They are not. Corner steadies are there to stop the van rocking once it is already level and parked. They are designed to steady, not to lift.
Trying to level a heavy motorhome by winding down a corner steady will bend the leg and can damage the floor where it mounts. The correct order is: level the van with ramps or blocks under the wheels first, then wind down the steadies just enough to take up the slack and stop the bouncing. Think of steadies as the thing that stops you feeling every footstep, not the thing that lifts the van.
That said, a good set of steadies genuinely transforms how solid a coachbuilt feels inside. Pair them with a level pitch and the van stops feeling like a vehicle and starts feeling like a small building.
Air suspension assistance: comfort, control, and a bit of leveling
Air suspension is not primarily a leveling system, but it is so often discussed alongside leveling that it deserves a proper section, because it overlaps and because people get confused about what it does.
What it actually is
Air suspension assistance adds air bags to the rear (and sometimes front) of the van, either to supplement or replace part of the standard steel springs. You inflate or deflate them to change ride height and stiffness. On a heavily loaded motorhome it stops the rear sagging, improves the ride, and reduces wallowing on motorways. Systems range from simple manual single-line kits you inflate with a compressor, to twin-bag systems with independent left and right control, up to fully automatic self-leveling air suspension that keeps the van at a set ride height whatever the load.
Where leveling comes in
With a twin-bag system that lets you inflate left and right independently, you can correct a side-to-side slope on a pitch by adding air to the low side. It will not give you huge travel, typically a few centimetres, so it handles mild slopes rather than serious ones. It also only affects the rear axle on most setups, so it is not a complete leveling solution. But for someone who mostly parks on gently sloping pitches and wants better ride quality anyway, air suspension is a lovely thing to have, and the minor leveling ability is a useful bonus.
The costs
A basic manual air-assist kit fitted is roughly £900 to £1,500. Independent twin-bag systems with an onboard compressor and cab controls run £1,500 to £2,500 fitted. Fully automatic self-leveling air suspension is more again. The big appeal is ride and load handling, not leveling, so buy it for those reasons and treat the leveling as a side benefit. If your real problem is sloping pitches, ramps are far cheaper and lift more.
Semi-automatic and automatic leveling systems: the premium answer
At the top of the tree sit dedicated leveling systems. Press a button, the van measures its own slope, extends legs or jacks at each corner, and levels itself in under a minute. These are common on larger and more expensive motorhomes and A-class vans, and they can be retrofitted to many coachbuilts.
How they work
Four jacks, one near each corner, drop down and push against the ground. A control box reads the van's attitude from built-in sensors and extends each jack as needed until the van is level. Some lift the wheels clear of the ground entirely, some just take the load and level. The two main technologies are hydraulic (a pump pushes fluid to the jacks) and electric (motors drive screw jacks). Hydraulic tends to lift more and faster and is favoured on heavy vans, electric tends to be lighter, simpler, and needs no fluid.
Semi-automatic versus fully automatic
Semi-automatic systems let you operate each jack yourself with buttons while watching a level display, giving you control and saving money. Fully automatic systems do the whole thing on one button press. Fully auto is gloriously easy. You arrive, you press, you put the kettle on. Semi-auto is nearly as good once you learn it and costs less.
The real costs
This is where budgets stretch. A retrofit four-point leveling system, supplied and fitted in the UK, typically lands somewhere between £3,000 and £8,000 depending on whether it is electric or hydraulic, the weight of the van, and how much fabrication the fitter needs to do to mount the jacks to your chassis. That is a serious sum, more than most people spend on every other piece of van kit combined. Factory-fitted as an option on a new motorhome, it is often a little cheaper as a line item but still runs into thousands.
What you get for the money
- Speed and ease. No getting out, no ramps, no guessing. Genuinely a few seconds of effort.
- Better leveling range. Jacks can correct slopes that ramps simply cannot, lifting a corner by a large margin.
- Rock-solid stability. A van on four planted jacks does not move when you walk around inside. It feels like a static caravan.
- No bending down in the rain. For owners with limited mobility, or anyone who tours in all weathers, this is a real quality-of-life upgrade.
What you give up
- Money, obviously, and it is a lot.
- Weight. A full hydraulic system can add 60 to 100kg or more, which eats into your payload, the spare weight you have for water, kit, and people. On a van that is already tight on payload, that matters a great deal.
- Complexity. More to go wrong. Pumps, sensors, seals, motors. Most systems are reliable, but when they fault they can be expensive and you may need a specialist. Sensible owners learn the manual override so a fault never strands them with the jacks down.
- Maintenance. Jacks need keeping clean, lubricated, and checked, especially after winter salt and mud.
Important safety notes
Never crawl under a van that is supported only by its leveling jacks. They are leveling devices, not axle stands. If the system lifts the wheels off the ground, the van must be on firm, stable ground, and you should never use the jacks as a substitute for proper support when working underneath. Many systems will warn you, but it is on you to use them sensibly. Also be aware that on very soft ground, jacks can sink and the van can lose level overnight, so carry pads to spread the load under each foot, the same principle as a base block under a ramp.
Matching the option to the van and the trips
So which should you actually choose? Here is the honest decision framework. Be realistic about how and where you travel, because that matters far more than the spec sheet.
Small campervan, UK weekends, club and CL sites
You almost certainly want a pair of good plastic ramps and a spirit level, and nothing else. UK club sites are mostly fairly level, the slopes you meet are mild, and a single ramp under one wheel sorts most pitches. Total spend around £30 to £50. Add a few leveling blocks if you like belt and braces. Spending thousands on automatic jacks for a small camper that weekends on flat pitches makes no sense, and the weight would hurt your payload.
Mid-size coachbuilt, longer UK and occasional European touring
Ramps remain the everyday tool. Buy heavy-duty ones rated for your weight, plus chocks and grip mats. Use the corner steadies for stability once level. If you tour a lot and value comfort, consider air suspension for ride quality, accepting that its leveling ability is limited. Total leveling spend can stay under £100 if you stick with ramps. This covers the vast majority of UK owners perfectly well.
Large coachbuilt or A-class, long trips, all seasons, two people living aboard for weeks
This is where automatic or semi-automatic leveling earns its place. If you spend weeks at a time in the van, often on rough or sloping pitches and aires, the daily ease, the stability, and the comfort genuinely add up. Just do the payload maths first. Heavy vans with generous payload can absorb the weight of a system. Vans already near their limit cannot, and adding 80kg of jacks could push you over your legal weight once you load water and gear.
Owners with limited mobility
If bending down to place ramps and chock wheels is difficult or painful, the case for an automatic system, or at least a semi-automatic one, becomes about more than convenience. Being able to level the van from a seat at the press of a button can be the difference between touring independently and not. Here the cost is more easily justified, because the alternative is relying on someone else every single pitch.
Common mistakes people make with leveling
Buying ramps too small for the van
A ramp rated for a small camper will flex, creak, and eventually crack under a three-and-a-half tonne coachbuilt, especially in cold weather when plastic gets brittle. Always check the weight rating against your van's actual axle weight, not its empty weight.
Forgetting the grip mat
The number one ramp complaint is the ramp skating across the ground instead of letting the wheel climb. A rubber grip mat or rubber-faced ramp fixes it instantly. If you have ever pushed a ramp ten feet across a wet pitch with your front wheel, you know exactly why this matters.
Leveling for the dashboard, not the floor
The dashboard or worktop is not always a true reference. Calibrate your bubble levels against the floor, the surface your bed and your fridge actually care about.
Trying to level with the corner steadies
Worth repeating because so many new owners do it. Steadies steady, they do not lift. Level on the wheels first, then steady.
Ignoring front-to-back when there is a fixed bed
If you sleep in a fixed bed at the back of a coachbuilt and the van is nose-down, your head ends up lower than your feet, which feels horrible and can be bad for sleep. Front-to-back matters more than people expect when the bed runs lengthways.
Relying on jacks as axle stands
Already said, but it is the one that actually hurts people. Leveling jacks are not safe supports for working underneath. Use proper axle stands, always.
Letting jacks or ramps sink overnight
On soft grass, both ramps and jacks can sink, so the van you levelled at 8pm is tilted by midnight. Carry pads to spread the load under each foot or ramp. A scrap of marine ply or a purpose-made jack pad does the job.
A note on doing it all manually with steadies and a jack
Some thrifty owners level using their vehicle jack plus blocks, or by parking carefully to use the natural lie of the land. This works in a pinch and costs nothing, but it is slow and a bit fiddly, and a trolley or bottle jack is not designed for repeated leveling duty. Parking to suit the slope, choosing a pitch that is already nearly flat, and pointing the van so any remaining slope is front-to-back rather than side-to-side, is a genuinely useful free skill that reduces how often you need ramps at all. Walk the pitch before you commit. A minute spent choosing where and which way to park can save you the whole ramp routine.
Storage, weight, and the small practical stuff
Whatever you choose, think about where it lives. Ramps and blocks are muddy, so a dedicated bag or a corner of the garage with a tray under it keeps the van clean. Keep your chocks, grip mats, and spirit level together with the ramps so you never arrive on site missing a piece. For automatic systems, keep the manual override instructions in the van and know how to use them, because a flat battery or a fault should never leave you stuck with the jacks down and no way to retract them.
On weight, remember that every kilo counts toward your maximum authorised mass. Ramps and blocks weigh a few kilos and are easy to absorb. Hydraulic jacks weigh a lot and are not. If you are buying or specifying a van and weighing up an automatic leveler, get the payload figure first, then decide whether you can spare the weight for the system, the water, the awning, the bikes, the dog, and everything else you actually want to carry.
Value for money: where each pound works hardest
If we are being strictly honest about value, the picture is clear.
- Best value overall: a pair of quality plastic ramps, chocks, a grip mat, and stick-on bubble levels. For around £40 to £70 all in, this solves leveling for the overwhelming majority of owners on the overwhelming majority of pitches. Nothing else comes close on cost per problem solved.
- Best value upgrade: add a set of stackable leveling blocks for the awkward pitches the ramps cannot handle. Another £30 or so, and now you can deal with almost anything.
- Best comfort-per-pound for tourers: air suspension, if and only if you also want the improved ride and load handling. Buy it for the ride, enjoy the mild leveling as a bonus.
- Best experience, if budget allows: a fully automatic leveling system. It is the nicest to live with by a distance, and for full-timers, all-season tourers, and owners with limited mobility it can be worth every penny. But it is a luxury in pure value terms, and the payload and complexity costs are real.
What's the best, honestly?
If you define best as the most capable and pleasant to use, fully automatic leveling wins. Nothing beats arriving on a lumpy pitch, pressing one button, and watching the van settle itself flat while you make a brew. For heavy vans, long trips, and anyone who finds bending awkward, it is the standout.
If you define best as the smartest spend, the answer is just as clear, and it is not the expensive one. A good pair of ramps does ninety-something percent of the job for one or two percent of the price. The vast majority of UK owners would feel no real benefit from spending thousands when forty pounds of plastic keeps them level on virtually every pitch they will ever use.
The trick is to be honest with yourself about which kind of buyer you are. The gear that suits a fortnight in the Highlands in a big A-class is not the gear that suits a Friday night dash to a CL site in a small camper. Buy for the trips you actually take, not the trips you imagine.
A simple plan for almost everyone
If you want a default recommendation to follow, here it is, in order:
- Buy stick-on bubble levels and fit them where you can see them from the driver's seat. Calibrate against the floor.
- Buy a pair of ramps rated comfortably above your van's axle weight, with chocks. Add a grip mat or buy rubber-backed ramps.
- Learn the pull-up, check, adjust routine until it takes under two minutes. Practice once on your driveway.
- Add a set of stackable leveling blocks for the unusual pitches. Keep them in the same bag as the ramps.
- Use your corner steadies, if fitted, only after the van is level on its wheels, and just enough to stop the rocking.
- Carry pads to put under ramps or jacks on soft ground so nothing sinks overnight.
- Only consider air suspension or automatic leveling once you genuinely know your touring style, and only after checking your payload can take the weight.
Do that and you will be level, comfortable, and a long way from out of pocket. Leveling is one of those rare areas where the cheap answer is also the right answer for most people, and the expensive answer is a real treat rather than a necessity. Spend the money you save on fuel and a good night out, and enjoy a van that finally sits flat.
The bottom line
Leveling matters because your sleep, your fridge, your drains, and your doors all depend on it. The full menu runs from a few pounds of bubble levels up to several thousand pounds of automatic jacks. For most UK campervan and motorhome owners, a quality pair of ramps with chocks, a grip mat, and bubble levels is both the best value and entirely good enough, with a set of leveling blocks as a sensible backup. Air suspension is a fine choice if you want the ride benefits too. Fully automatic systems are the most pleasant to use and the right call for heavy vans, full-timers, and owners who need the ease, provided you can spare the weight and the cash. Work out which buyer you are, buy for the trips you actually take, and you will get it right.
Enjoyed this post?
Get more honest campervan guides like this one in your inbox.
You’re in!
Check your inbox. We’ve just sent you a welcome email.

About the author
Leo
Leo covers campervan technology, maintenance, kit, and ownership advice, with a clear, practical focus on how things work in real life.
Keep Reading
Related Reading
Thoughtful articles that build on what you’ve just read.
Campervan Kit & Gear
27 min read
Lock'n'Level review: a great little tool, and why a smart 'Pro' version makes sense
An honest, hands-on look at the Lock'n'Level levelling system, what it does brilliantly, where it falls short, and why an app-connected electronic version with auto-levelling would be a natural next step.

Campervan Kit & Gear
25 min read
ARB awning vs Thule awning: one's for 4x4s, one's for campervans
ARB and Thule both make excellent awnings, but they're built for different vehicles and different lives. One is a rugged, rack-mounted pull-out for 4x4s and overlanders; the other is the wind-out cassette awning that defines campervan and motorhome touring. Here's how they really compare, and which one you actually want.

Campervan Kit & Gear
25 min read
Is ARB worth it? The 4x4 gear, honestly reviewed
ARB is the Australian 4x4 giant whose lockers, suspension, fridges and awnings turn up on the world's most serious overland vehicles. But is it worth the premium for a UK campervan or 4x4 camper owner? Here's an honest review of the standout ARB kit, what to skip, and what it really costs.

Campervan Kit & Gear
25 min read
Campervan flyscreens: the £40 option vs the £500 one
Flyscreens are the difference between sleeping with the door open on a warm night and being eaten alive by midges. Here's the full guide to campervan flyscreens: the types, what they cost, magnetic versus sliding, manufacturer-fit versus custom, and which are genuinely worth buying.