Campervan Kit & Gear
Lock'n'Level review: a great little tool, and why a smart 'Pro' version makes sense

Written by
Leo
Leo covers campervan technology, maintenance, kit, and ownership advice, with a clear, practical focus on how things work in real life.
Levelling a campervan or motorhome is one of those jobs nobody warns you about until your first night, when the fridge sulks, the shower water pools at one end of the tray, and you keep gently rolling towards the wall in bed. It is a small problem with a big effect on comfort. Lock'n'Level is a simple British product built to solve it, and for the most part it does the job very well. In this review I want to be honest about what it is, how it works in real life, where it shines, and where it leaves you wanting more. I also want to take seriously the idea that a lot of owners share: a 'Pro' version with electronic sensors, smart functions, and an app that could level the vehicle for you. That is not a daft wish. It is the obvious direction of travel, and it is worth explaining exactly how it could work and what it would and would not solve.
If you have never used a dedicated levelling aid, this guide will tell you everything you need to decide whether Lock'n'Level is right for you. If you already own one and find yourself muttering 'this is great, but...' on a sloped pitch, you are in the right place too.
Why levelling matters more than new owners expect
Plenty of people buy a van and never think about levelling until something goes wrong. Then they think about it constantly. Here is why it matters.
Your fridge depends on it
Most motorhomes and many campervans use an absorption fridge, the three-way type that can run on gas, 12V, or mains. Absorption fridges work by circulating a liquid that relies on gravity. If the van sits at a noticeable angle, that circulation is disrupted, cooling efficiency drops, and over time you can damage the cooling unit. Manufacturers typically quote a tolerance of around two to three degrees off level for these fridges. Compressor fridges, which are increasingly common in modern campervans, are far more forgiving and will happily run at steeper angles. But if you have an absorption fridge, levelling is not a comfort nicety, it is part of looking after expensive kit.
Sleep, and the slow roll
A bed that tilts even a degree or two head-to-toe or side-to-side changes the night completely. Sleep with your head downhill and you wake up stuffy. Sleep on a side slope and you spend the night bracing against gravity. Get the van level and you stop noticing the floor entirely, which is the whole point.
Water, drainage and the bathroom
Shower trays, sinks and waste systems are designed to drain when the vehicle is roughly level. Park nose-down and water collects at the front of the shower tray. Park nose-up and your grey waste may not drain fully towards the outlet. Fixed toilets and their flush mechanisms also behave better on the level.
Doors, blinds and the general feel
On a slope, habitation doors swing shut or refuse to stay open, cupboard doors drift, pleated blinds hang at an angle, and the whole interior feels subtly wrong. Levelling tidies up dozens of tiny irritations at once.
The honest summary: levelling is the difference between camping in a vehicle and living comfortably in a small home. It takes two minutes once you know how, and it transforms the evening.
What Lock'n'Level actually is
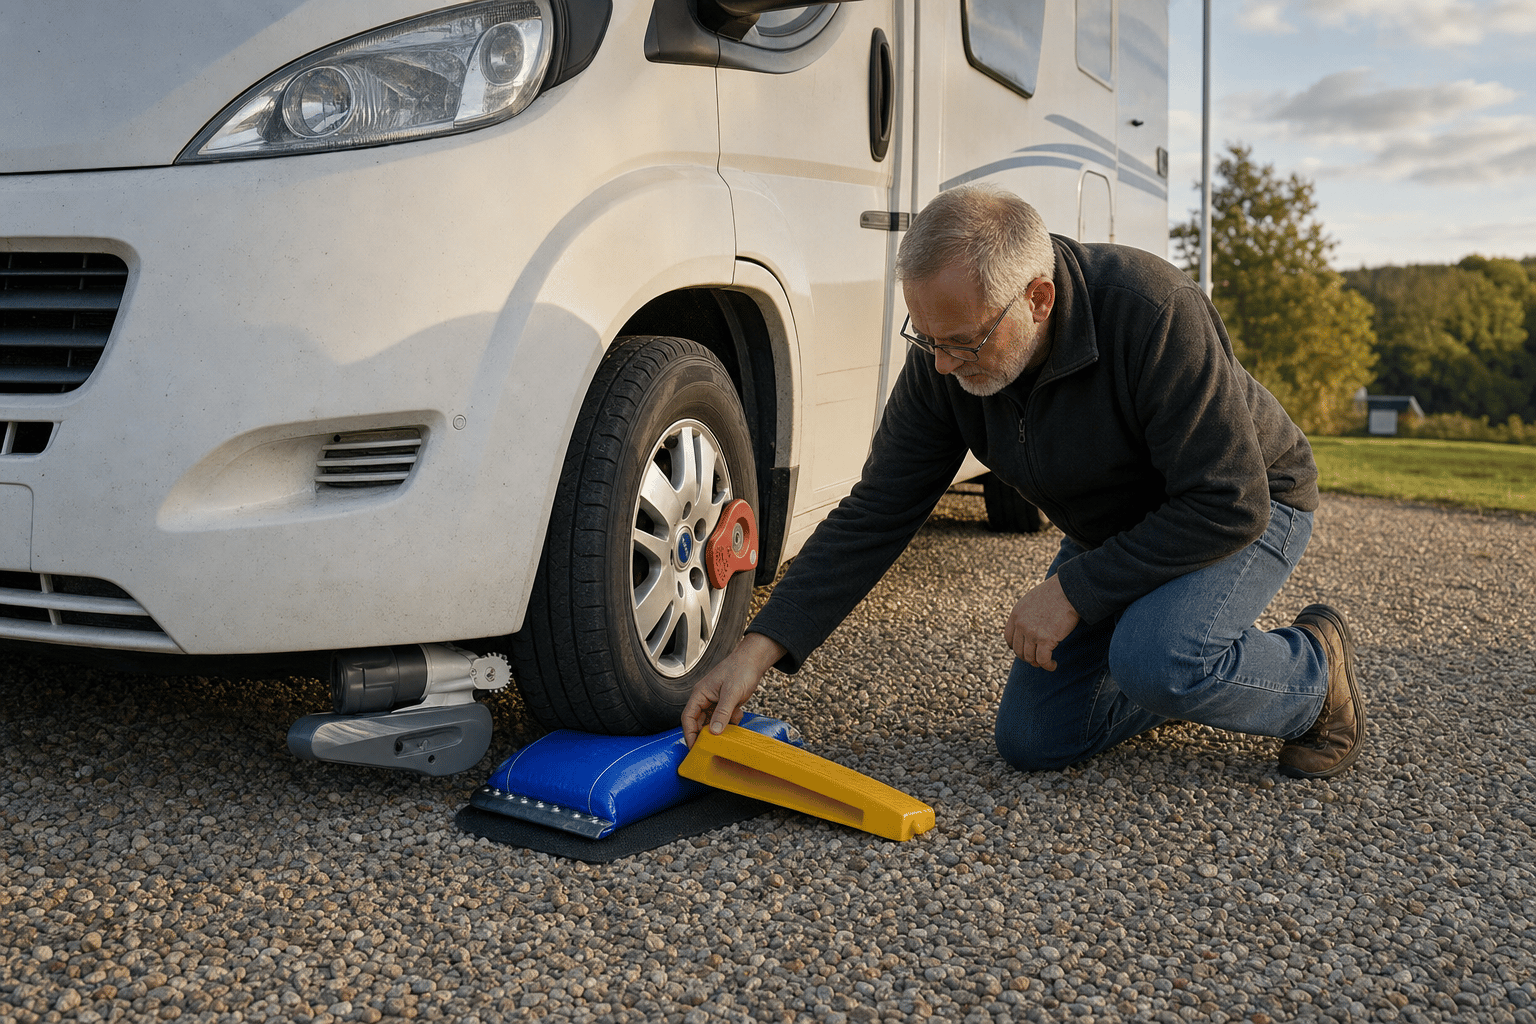
Lock'n'Level is a levelling system made up of two parts that work together. The first is a visual indicator, essentially a precision bubble or cross-level gauge that you fit somewhere you can read it from the cab, usually on or near the dashboard. The second is a set of ramps, or wedge-shaped chocks, that you drive a wheel or pair of wheels onto to raise that corner of the vehicle.
The clever bit is how the two are designed to be read together. Rather than guessing how far to drive up a ramp, the system is set up so the indicator tells you which direction the van needs to go and roughly how much correction it needs. You position the ramps, read the gauge, drive on, and stop when the bubble sits where it should. Once you are level, you chock the wheels to stop the van rolling back off the ramps, and you are done.
It is a thoroughly analogue solution to an analogue problem, and there is real elegance in that. No batteries, no firmware, no app to crash, nothing to go flat at the worst moment. You glance, you drive, you stop. For a huge number of owners that is exactly what they want.
What comes in the box
Depending on the kit you choose, you typically get:
- The levelling indicator or gauge, designed to be fitted permanently or semi-permanently where the driver can see it.
- A pair of ramps or levelling wedges sized for the weight of vehicle they are rated to.
- Wheel chocks to hold position once you are level.
- Fitting instructions and guidance on calibrating the gauge to your specific vehicle so it reads true.
The ramps are the workhorses. They need to be strong enough to carry a fully laden corner of your vehicle without flexing or cracking, and grippy enough not to skate across a damp pitch as you drive up.
Setting it up: getting the gauge to tell the truth
The single most important step with any levelling indicator is calibration. A gauge is only useful if it reads level when the vehicle is genuinely level. Get this wrong and you will chase the bubble all evening and still wake up on a slope.
Find true level first
The reliable method is to park the van on ground you know to be level, or to make it level using a good independent reference. A long spirit level laid across the floor inside, in two directions, is the classic approach. Better still, use a digital inclinometer or even a phone levelling app placed on a hard, flat interior surface to confirm both the side-to-side and front-to-back angles are as close to zero as you can get. Adjust the van's position with ramps until your independent reference agrees it is level in both planes.
Then set the gauge
With the van confirmed level, fit or adjust the Lock'n'Level indicator so it reads dead centre. From that point on, the gauge is calibrated to your vehicle and your mounting position. This matters because dashboards are rarely perfectly horizontal, and the gauge needs to compensate for wherever you have stuck it.
Mounting position
Choose somewhere you can read clearly from the driver's seat without leaning, that does not get washed out by sun glare, and that is on a stable part of the dash or trim. Avoid soft or flexing plastic that moves when you press it. Many owners fit it slightly to the left of the wheel where the eye falls naturally. Take your time here, because a gauge you have to squint at defeats the purpose.
Living with it: the real-world routine
Here is how a typical arrival plays out once Lock'n'Level is set up properly.
- You pull onto the pitch and stop roughly where you want to end up.
- You glance at the gauge. It tells you which corner is low.
- You place the ramp in front of (or behind) the wheel that needs raising.
- You drive gently up the ramp, watching the gauge, and stop when the bubble centres.
- You chock the wheels so the van cannot roll back down.
- You apply the handbrake firmly and, if it is a manual, leave it in gear.
With practice the whole thing takes a couple of minutes, often without leaving the cab more than once. On a mildly sloped pitch you may only need to raise one wheel slightly. On a properly awkward pitch you might need ramps on two wheels, and you learn to tackle the bigger correction first.
What it gets right day to day
- Speed. Once you trust the gauge, you stop guessing. You drive to the bubble and you are done.
- No power needed. Nothing to charge, nothing to fail in the cold.
- Reading from the seat. The big advantage over a loose bubble level or a phone on the floor is that you can correct your position while driving up the ramp, rather than parking, getting out, checking, repositioning, and checking again.
- Robust. Good ramps and a simple gauge will outlast a lot of fancier kit.
What grates after a while
No product is perfect, and a fair review names the friction points.
- You still get out. You place ramps and chocks by hand, often in the rain, often in the dark. The gauge saves guesswork, not legwork.
- Steep pitches expose the limits. Ramps can only lift a wheel so far before the gradient becomes too aggressive to drive up cleanly, or before the ramp starts to slide. On a badly sloped pitch you may not be able to get fully level at all.
- Ramp slip on wet grass. This is the classic frustration. You drive up, the ramp skates forward on greasy turf, and you end up chasing it. A grippy base and sometimes a board underneath help, but it is still a faff.
- Reading by night. A non-illuminated bubble gauge is hard to read in the dark, so you end up holding a torch or relying on cab lighting.
- It is a single-glance snapshot. It tells you the angle now. It does not log anything, warn you, or help you remember what worked on a pitch you have used before.
None of these are deal-breakers. They are simply the ceiling of what a purely mechanical, analogue tool can do. And that ceiling is exactly why the request for a smarter version makes so much sense.
The case for a Lock'n'Level Pro: electronic sensing and an app
The reader's wish is clear and reasonable: a Pro version that adds electronic sensors and smart functions, so that an app could read the vehicle's angle precisely and, ideally, help level the vehicle automatically. Let me unpack that into the parts that are genuinely achievable, the parts that are harder, and the parts that already exist in adjacent products.
The easy, obvious win: a digital sensor and a phone app
The cheapest and most achievable upgrade is to replace, or supplement, the bubble gauge with a small electronic inclinometer. These sensors are inexpensive, accurate to a fraction of a degree, and tiny. Pair one to your phone over Bluetooth and you immediately get:
- A precise numeric readout of pitch and roll, in degrees, rather than a bubble you eyeball.
- Clear on-screen guidance telling you exactly which corner is low and by how much, ideally translated into 'raise this wheel by roughly this amount'.
- Audible and visual cues so you can keep both hands on the wheel and listen for a tone that rises as you approach level, then beeps when you are there. No squinting at a bubble in the dark.
- Backlit, readable-at-night display on the phone you already have in your hand.
This alone would solve several of the day-to-day annoyances. It would not lift the van for you, but it would make manual ramping faster, more precise, and far easier after dark. Crucially, it keeps the cost low and the reliability high.
The genuinely useful smart layer: memory and pitch profiles
Once you have a sensor and an app, you can do things a bubble simply cannot.
- Pitch memory. Save a successful setup tied to a location. Return to a favourite campsite or a regular overnight stop and the app reminds you 'last time you raised the nearside rear by two ramp steps'.
- Fridge-safe alerts. Set a tolerance, say two degrees, and have the app flag clearly when you are within the safe window for an absorption fridge. A simple green tick is far more reassuring than judging a bubble by eye.
- Calibration that travels. Recalibrate digitally with a button press rather than physically adjusting a gauge, useful if you change vehicles or move the sensor.
- Ramp-step guidance. If the app knows the rise per step of your specific ramps, it can tell you the exact step to aim for rather than 'a bit more'.
- A history log. Handy for spotting if your habitual stop is always nose-down, so you can pack the right gear.
This is the sweet spot. It is achievable now with off-the-shelf components, it is genuinely useful, and it respects the simplicity that makes the original product good. A sensor, a tidy app, and clear guidance would be a meaningful step up without pretending to be something it is not.
The big ask: actual automatic self-levelling
Now the headline wish: an app that levels the vehicle by itself. This is where we need to be honest about engineering and money, because there is a world of difference between a sensor that tells you what to do and a system that physically lifts the vehicle.
To level a vehicle automatically you need actuators, things that can push down on the ground or extend legs to raise corners of the van. There are two established ways this is done, and neither is a small bolt-on.
Hydraulic levelling jacks
These are powered legs mounted to the chassis, usually four of them, driven by a hydraulic pump. You press a button (or, increasingly, use a panel or app), the system reads its own angle sensors, and it extends the legs in sequence to lift and level the vehicle. Big American-style motorhomes have used these for decades, and they are superb. Press one button, walk away, come back to a perfectly level coach. They also stabilise the vehicle so it does not rock when you move around inside.
The catch is weight, cost, and fitment. A full hydraulic system adds a significant amount of weight, which is a serious consideration on a UK motorhome already wrestling with payload limits and the 3,500kg licence threshold. It needs chassis mounting, a pump, hydraulic lines, and a control system. It is expensive to buy and to fit, and it is overkill for a small campervan that just needs a couple of degrees of correction.
Electric or air levelling
Electric levelling systems use motorised legs instead of hydraulics, and air-suspension levelling raises or lowers the vehicle by adjusting air bags on the suspension. Air systems are particularly neat on rear-wheel-drive chassis with air suspension already fitted, because they can level the rear without dropping legs at all. Again, these are integrated, vehicle-specific systems, not something you clip to the dashboard.
So could a 'Lock'n'Level Pro' truly self-level?
Realistically, a Pro version of a ramp-and-gauge product is not going to lift your van on its own, because the lifting hardware is the expensive, heavy, vehicle-specific part. What a Pro product could very sensibly do is become the brain and the interface, and there are two plausible routes.
- The smart guidance route. Keep the manual ramps, add a precise sensor and a brilliant app, and make manual levelling as quick and foolproof as it can possibly be. This is achievable, affordable, and would delight most owners.
- The modular hardware route. Offer the sensor and app as the core, then sell compatible powered chocks or self-levelling ramp units that the app can control. Motorised chocks that drive a wheel up to a target height under app control are the closest thing to genuine self-levelling that suits a campervan. The app reads the angle, commands the motorised units, and stops when level. This exists in concept and in some products already, and it is the most realistic path to true one-button levelling for a smaller vehicle.
The dream of tapping a phone and watching the van settle itself is not science fiction. It is just a question of where the lifting power comes from, how much it weighs, and how much you are willing to spend.
What an ideal smart levelling app would actually do
If a manufacturer asked me to specify the app for a Pro version, here is the feature list I would want, ranked by how much it genuinely helps.
Core, non-negotiable features
- Live pitch and roll in degrees, large and clear, with an at-a-glance graphic of the vehicle showing which corner is low.
- Audio guidance for driving up ramps, a rising tone that peaks and beeps at level so you never take your eyes off the windscreen.
- A fridge-safe tolerance indicator, a simple colour change when you are within the safe angle for your appliances.
- One-tap calibration to zero the sensor against your own confirmed-level reference.
- Offline operation. It must work with no signal, because the best pitches are often where there is no phone reception at all.
Genuinely useful extras
- Saved pitch profiles by location, so repeat stops are quicker.
- Ramp-step translation, turning 'you are 1.5 degrees low at the nearside rear' into 'drive up to the second step on the nearside rear ramp'.
- A simple stability check, confirming the handbrake-and-chock routine is sensible for the gradient you are on.
- Multi-vehicle support, for households or hire fleets running more than one van.
Things I would deliberately leave out
- Accounts and logins for basic use. Nobody wants to register an account to find out if their bed is flat.
- Cloud dependence. The sensor must talk to the phone directly. If the only way it works is via a server, it will fail you in a forest in mid-Wales.
- Subscriptions for core function. Levelling is not a service. It is a one-off purchase that should keep working for years.
That last point matters. The original Lock'n'Level appeals precisely because it is bought once and works forever. A Pro version that locked basic levelling behind a monthly fee would betray the very thing that makes the product trustworthy.
The hard truth about reliability and batteries
Whenever you add electronics to something that used to be purely mechanical, you add failure modes. A bubble gauge does not have a flat battery on a frosty November evening. A Bluetooth sensor might. This is not a reason to avoid going electronic, but it is a reason to design it carefully.
Power source choices
- Hardwired to the vehicle's 12V supply. Most reliable, no batteries to replace, but needs fitting and a feed from a switched or permanent live.
- Replaceable coin or AA cells. Simple, but you must remember to carry spares, and cold weather saps battery performance.
- Rechargeable with a long standby life. Convenient if the standby drain is genuinely low, frustrating if you have to remember to charge it.
My strong preference would be a hardwired sensor with a tiny backup cell, so it is always alive when the ignition is on and never strands you. Whatever the choice, the design should fail gracefully: if the electronics die, you should still be able to fall back to a basic visual reference. Belt and braces.
How Lock'n'Level compares to the alternatives
To judge any levelling product fairly, you have to compare it to how people otherwise solve the problem. There is a whole spectrum, from free to seriously expensive.
The eyeball and a brick
Plenty of owners level by feel, using whatever blocks of wood, bricks, or random ramps they have, and judging level by standing a bottle of water on the worktop. It is free and it sort of works, but it is slow, imprecise, and you tend to overcook the correction. Lock'n'Level is a clear upgrade on this in both speed and accuracy.
A loose bubble level on the worktop
A cheap cross-level stuck to a windowsill or worktop tells you the angle but only when you are parked and standing inside. You cannot read it while driving up the ramp, so you end up in the park-check-reposition-check loop. The whole point of a dash-mounted gauge is to break that loop. This is where Lock'n'Level earns its keep.
Phone levelling apps
Your phone already has an inclinometer, and free apps will show you the angle. The problem is placement and reading: you have to lay the phone on a flat interior surface, then go and drive, then come back and check. It is fine as a calibration reference but clumsy as a live tool. Ironically, a Pro version of Lock'n'Level with its own fixed sensor and a phone app would combine the best of both: a properly mounted sensor and the rich display of a phone.
Stacking ramps and step chocks
Multi-level ramps and stacking chocks give you more height options than a single fixed wedge, which helps on steeper pitches. They pair naturally with any gauge. Many owners end up using Lock'n'Level's gauge alongside their preferred ramps, and there is nothing wrong with mixing and matching.
Built-in powered systems
At the top end sit the hydraulic and electric levelling systems described earlier. They are wonderful and they are a different category of cost and weight. If you have a large coachbuilt or A-class and the payload to spare, a factory or aftermarket powered system is the gold standard. For a panel-van campervan, it is usually more than you need and more weight than you want.
The fair conclusion: Lock'n'Level sits in the sweet spot between guessing with a brick and spending thousands on hydraulics. For the money, it solves the problem well. The gap it leaves is the gap that a smart, sensor-and-app version would naturally fill.
Weight, payload and why it matters for any levelling kit
This is the part owners forget, and it deserves its own section because it shapes which levelling solution is sensible for you.
UK motorhomes and campervans are tightly constrained by weight. Many are built on a 3,500kg chassis so they can be driven on a standard category B car licence. Once you load fuel, water, gas, passengers, bikes, the awning, the food and all your stuff, payload disappears alarmingly quickly. Every kilo of fixed equipment you bolt on is a kilo you cannot carry as useful load.
Ramps and chocks are light, and that is a virtue
A set of plastic ramps and chocks weighs a few kilograms and lives in a locker. You can take them out if you are running close to your weight limit. That flexibility is a genuine advantage of the Lock'n'Level approach over fixed systems.
Hydraulic and electric jacks are heavy, and permanent
A full powered levelling system can add a meaningful chunk of weight that is bolted to the chassis and can never be removed for a heavy trip. On a 3,500kg van with tight payload, that is a real trade-off. On a heavier C1-licence motorhome with generous payload, it is far less of an issue. Know your vehicle's plated weights, weigh it loaded if you can, and factor the kit into your sums before you commit.
The Pro-version implication
This is another reason the smart-guidance route appeals more than full self-levelling for most campervans. A sensor weighs almost nothing. An app weighs nothing at all. You get most of the convenience benefit with none of the payload penalty. Reserve the heavy powered hardware for vehicles that can genuinely carry it.
Safety: the bit you must not skip
Levelling involves driving a multi-tonne vehicle partly up a ramp and then trusting it not to move while you sleep inside it. Take the safety basics seriously.
Always chock once level
The handbrake alone is not enough when a wheel is sitting on a ramp under tension. Place chocks so the van cannot roll back off the ramp. On a manual, leave it in gear as well. On an automatic, use Park and chock. This is not optional.
Watch the ramp surface
Wet grass, loose gravel and mud all let ramps slide. A rubberised base, a board under the ramp, or simply picking a firmer spot all help. If a ramp skates as you drive up, stop, reposition, and try again rather than gunning it.
Do not over-lift
Lifting one wheel very high puts the vehicle at an awkward angle and can stress the suspension and reduce stability. If a pitch needs more correction than the ramps comfortably allow, the honest answer is sometimes to move to a better spot. A two-degree compromise you can live with beats a precarious lift.
Mind the gauge mounting
If you hardwire an electronic sensor, route the cable safely, fuse it correctly, and do not tap into anything safety-critical. If in doubt, have an auto electrician do the feed. A badly wired accessory is not worth the risk.
Who Lock'n'Level suits, and who might want to wait for a Pro version
Buy the current product if
- You want a simple, reliable, no-batteries solution that just works.
- You value being able to read the gauge from the driver's seat while you drive up the ramp.
- You camp on a mix of pitches and want something light you can stow in a locker.
- You like the idea of nothing to charge, update, or pair.
You might hold out, or supplement it, if
- You frequently arrive and level in the dark and want audio guidance and a backlit readout.
- You want precise degree readings and a fridge-safe tolerance alert rather than judging a bubble.
- You return to the same pitches often and would love saved profiles.
- You genuinely want hands-off, one-button levelling and have a vehicle with the payload and budget for a powered system, in which case a dedicated hydraulic or electric kit may suit you better than waiting.
A realistic verdict on the product as it stands
Lock'n'Level does what it sets out to do. It turns guessing into glancing. The dash-readable gauge is the heart of it, and the ability to correct your position while driving up the ramp is the feature that makes it noticeably better than a loose bubble level or a phone on the worktop. The ramps and chocks are practical, light, and easy to stow. Set the gauge up carefully with a proper calibration and it will serve you reliably for years with nothing to go wrong.
The limitations are the honest limitations of any mechanical, manual system. You still get out and place the gear, steep pitches expose the height ceiling of ramps, wet grass causes the occasional ramp skate, and reading a bubble at night is awkward. None of these are faults of design. They are simply the edge of what a no-power tool can do.
That is precisely why the call for a Pro version resonates. The product is good enough that you start wishing it could do the few things it cannot, and those things are all squarely in the realm of sensors and software.
The Pro version I would actually want to buy
If a smart version arrived, here is the spec that would win me over, in plain terms.
- A small, hardwired electronic sensor with a backup cell, reading pitch and roll to a fraction of a degree.
- A clean, offline-first app showing a clear vehicle graphic, live angles, and exactly which wheel to raise and by how much.
- Audio guidance so I can drive up the ramp watching the road, with a beep at level.
- A fridge-safe tolerance light, green when I am within range.
- Saved pitch profiles for my regular stops.
- One-tap calibration, no account, no subscription, no cloud dependence.
- Optionally, a modular motorised chock that the app can drive a wheel up to target height, for owners who want true hands-off levelling and accept the extra cost and weight.
That product would keep everything good about the original, fix the night-time and precision annoyances cheaply, and offer a clear upgrade path to genuine self-levelling for those who want it. It would not pretend that a dashboard gadget can lift a three-tonne van on its own, because it cannot. The lifting has to come from somewhere, and that somewhere is either your ramps or some powered hardware bolted to the chassis.
Practical tips to get the most out of levelling, whatever kit you use
Whether you stick with the current Lock'n'Level, wait for a smarter version, or build your own sensor-and-app setup, these habits make every arrival smoother.
Survey the pitch before you commit
Walk the pitch for ten seconds before you drive on. A glance tells you which way it falls and roughly how bad it is. Park so the easier correction is the one you make. It is far simpler to raise the front than to wrestle a steep side slope.
Correct the bigger axis first
If the van is off in both pitch and roll, sort the side-to-side first, because that is the one you feel most in bed and the one most likely to make you roll. Then fine-tune front to back.
Keep a board in the locker
A thin, sturdy board to put under your ramps on soft or wet ground prevents both sinking and sliding. It is the single cheapest upgrade to any ramp-based system.
Mark your ramp steps
If your ramps have steps, a dab of paint or tape numbering them makes it easy to repeat a setup or follow app guidance like 'second step'. Small thing, big help.
Confirm level with a second reference now and then
Even with a calibrated gauge, it is worth occasionally checking with a spirit level or a phone app to make sure nothing has drifted. A bubble can be knocked, a sensor can need recalibration. Trust, but verify.
Develop a one-glance fridge habit
If you run an absorption fridge, get into the habit of checking you are within a couple of degrees before you switch it over to gas for the evening. Protecting the cooling unit is far cheaper than replacing it.
The bigger picture: levelling is part of the slow-touring rhythm
It is easy to treat levelling as a chore, but there is something to be said for the little ritual of arriving, surveying the pitch, nudging the van level, and settling in. It is the moment the vehicle stops being transport and becomes home for the night. A good tool makes that moment quick and satisfying rather than fiddly and frustrating, and that is really what we are talking about when we debate bubbles versus sensors versus self-levelling jacks. We are talking about how good the first ten minutes on a pitch feel.
Lock'n'Level, as it stands, makes those ten minutes better. A thoughtfully designed smart version could make them better still, especially in the dark and the wet, without throwing away the simplicity and reliability that make the original worth owning. And for the small number of owners who genuinely want to tap a phone and watch the van settle itself, the honest answer is that the technology exists, it just lives in heavier, pricier powered systems rather than in a clip-on gauge. Knowing which of those you actually need is the whole point of a review like this.
Bottom line
Lock'n'Level is a genuinely good, sensible product that solves a real problem with quiet British practicality. The dash-readable gauge plus ramps approach beats guessing, beats a loose bubble level, and beats faffing with a phone on the worktop, all without batteries or fuss. Its limits are the limits of any manual system: you still place the gear yourself, steep and wet pitches test it, and night-time reading is awkward.
The reader's wish for a Pro version is spot on as a direction. A precise electronic sensor with a clean, offline app would fix the precision and night-time niggles cheaply and keep the reliability high. Saved pitch profiles and a fridge-safe tolerance light would be the icing. True one-button self-levelling is achievable too, but it needs powered hardware and brings weight and cost that suit larger motorhomes far more than light campervans on tight payload. If you want simple and dependable now, the current product earns its place in your locker. If you want smart, the sensible Pro version is the one that adds a brain and an interface while leaving the muscle to your ramps, and that is a product I would happily buy the day it launched.

Enjoyed this post?
Get more honest campervan guides like this one in your inbox.
You’re in!
Check your inbox. We’ve just sent you a welcome email.

About the author
Leo
Leo covers campervan technology, maintenance, kit, and ownership advice, with a clear, practical focus on how things work in real life.
Keep Reading
Related Reading
Thoughtful articles that build on what you’ve just read.

Campervan Kit & Gear
24 min read
Campervan leveling options: what's best, what's best value, and what should you choose?
A plain-English, in-depth look at every way to level a campervan or motorhome on a sloping pitch, from £20 ramps to fully automatic hydraulic systems, with honest UK prices and advice on which one actually suits you.

Campervan Kit & Gear
25 min read
ARB awning vs Thule awning: one's for 4x4s, one's for campervans
ARB and Thule both make excellent awnings, but they're built for different vehicles and different lives. One is a rugged, rack-mounted pull-out for 4x4s and overlanders; the other is the wind-out cassette awning that defines campervan and motorhome touring. Here's how they really compare, and which one you actually want.

Campervan Kit & Gear
25 min read
Is ARB worth it? The 4x4 gear, honestly reviewed
ARB is the Australian 4x4 giant whose lockers, suspension, fridges and awnings turn up on the world's most serious overland vehicles. But is it worth the premium for a UK campervan or 4x4 camper owner? Here's an honest review of the standout ARB kit, what to skip, and what it really costs.

Campervan Kit & Gear
25 min read
Campervan flyscreens: the £40 option vs the £500 one
Flyscreens are the difference between sleeping with the door open on a warm night and being eaten alive by midges. Here's the full guide to campervan flyscreens: the types, what they cost, magnetic versus sliding, manufacturer-fit versus custom, and which are genuinely worth buying.